Showing posts with label walk-out basement. Show all posts

Family Room Foyer


At the bottom of the stairs in the basement is a transitional space. Similar, in a way, to an entryway or foyer at the front of the house.  Forever we had Tanner’s computer desk here and it was always a wreck, thus, your first impression when you got to the basement was UHG!
But now, since Ryan finished the Kid’s Den and all the crap is contained behind a door that can be closed, we decided to focus on making this area more welcoming.  We moved the wine cabinet over, got two new chairs from Pier One, a table and lamp from Cameron’s and then some art on the walls and here you have it.
When you are coming down the stairs, now you see this. (It appears we have drank all the wine in the wine cabinet.)
DSCF1313
Across from the cabinet you see this.
DSCF1317
And we found these cool mirrors at Old Time Pottery. They were on sale for $7.99 each.
DSCF1325DSCF1326t
It’s got a retro feel to it that we both really like, and it’s nice to have a punch of color in our Perpetual Sea of Brown.

Office Flooring

I am just loving my new home office.  I usually work 45-50 hours a week, and at least 35 of those hours are here at home. Having the office complete and not being shoved into various holes around the house has really made me realize how your environment impacts what you do.
A big question mark for us as we made decisions on this space was the flooring.  Since I work so much from home, it’s vital to have a flooring that will hold up.  At the old house, we did a berber, but after less than a year, it was showing wear, so I got one of those plastic things for under the chair.  I’d always catch the wheels of the chair on it, which I found irritating.

Options:

Tile – but I didn’t want to bump across that, either and the office is in a basement, so I was worried about the cold.  Couple that with the fact that Ryan JUST finished tiling the Family Room Bar, Bath and new hallway, he wasn’t super keen on the idea either.

Stained Concrete - as I researched it, I realized the amount of work involved in that.  And while an inexpensive option as compared to others, the cost still adds up, and there are maintenance issues, too. 

Laminate Flooring - This looked like our best option: at about $4-$6 a square foot, I could roll around on this floor to my heart’s delight. One problem, I didn’t love the look. 

Engineered Wood Flooring - Cost: $6-$11 a square foot.  Can lay right down on my basement floor and is real wood.  In fact, some of these products can be refinished up to 3 times because it’s real wood on top of the manmade product.  Downsides?  The price is going up AND now I have to be careful with my chair.

We had been checking out the products at various stores when we stopped in at Big Bob’s.
image
We started looking at the wood products, and then found CARPET! Specifically Carpet Squares that are used in Commercial Office Space!  Cost: .99 – 1.99 a square foot!  woo hoo! 
IMG_0355

In addition to solids, there were plenty of other options.
IMG_0357
    IMG_0359
IMG_0361
And we went with this.  In person it looks like a nice wool rug.
IMG_0358

Installation? Super easy.  We laid it all out and cut our squares before putting it down. Next, roll on some sticky adhesive – use very little – wait about 45 minutes and then stick the squares down.  The squares don’t slide around, but can be pulled up, repositioned and even replaced.  It looks great and feels better!  We will use this when we finish the kid’s room.  It would be great in a lot of places.  It took us about three hours to complete.  See more the final pics here.

Linked to Remodelaholics.

Were we really crazy?

Wow!  Things have been crazy around here.  We had WONDERFUL house guests last weekend: Ry's bro, Dave, his wife, Renee, and their son, Cayman.  And Ry's sis, Terri and her H, Scott, got to come by Saturday night, too. 

So much fun: talking, laughing, eating, drinking and making merry! And then the Chief's game! oh, yes. (sorry, Renee, but, at least this year someone went home happy!)

As it always seems to happen with house guests, you rush-rush to finish up all those tiny details, which is great, but can be tiresome.  One of mine was to finish up the office (not there yet...but almost!), and in the midst of my getting organized, I ran across a couple of pics from the home inspection report that was done before we bought the house.   Here's the before and afters of the deck and under the deck. I think this gives you a really good taste of where this entire project began.

Here's the upper deck.  The broken railings are obvious, but it's really hard to appreciate the sad state of the wood.  I don't believe the cedar had ever been retreated.  And there was that weird greasy/oil stained area in the lower right of the photo. Oh, and some rotting boards, too.


We repaired the railing, replaced the rotting boards, powerwashed, sanded and stained the deck.

Here she is now.


She'll need another stain job soon!

Here's below the deck. This was great!  That's all gravel and tree-like weeds growing there.  The rotting hot tub was filled with grody water and tadpoles. yummy.


The gravel was contained by the Pavestone blocks.  And the gravel wasn't really thick enough to cover all the mud and dirt, that's why we had so many of those tree-like weeds growing in there.  We cleaned, rebuilt and moved the hot tub, poured some patios, put in a stone path and landscaped under here.

And here's the after.


Man, looking at these before photos make me question our sanity.  I think I have forgotten the level of disrepair this poor house had been left to.  But it also makes me thankful that we have the opportunity to bring her back and really make her ours.

And while we're at it, we are having some windows replaced in our bedroom. I was taking pictures of the workings of the casements for window guy, and got this pic by leaning out the window from our bedroom.


It sure looks pretty from up here! Makes me want to add a door and a deck off the bedroom.  Think Ryan will go for that?

Linked to FIF at Chic on a Shoestring Budget and RemodelAholics!

My most favorite...about the bar

We redid the Family Room Bar this Winter/Spring.  Here are the Before and Afters and pictures of the "wine cellar" and oven HERE.

We are using this space much more than we imagined. We've even used the oven a ton. Here are some of my favorite things about it right now. 

First, the glass tile we chose as the back splash.  Can you see how it catches the light.  It's really lovely. I also love these corbels.  They were reclaimed from my Mother-in-Law's house when she pulled them out of a bathroom.  They sat in her flower shed for several years and were headed for the dumpster. They were dirty and had spider sacks on them.  We cleaned them up and held on to them for the perfect project.  Here, they simply got a new paint job and then were installed.


Now, one might argue that this is Ryan's favorite part. We built this for wine storage and to display different whiskeys and bourbons. ( I still don't know the difference between the two.)  It turned out just as we designed it. Below this is a cabinet and wine chiller.  This area is functional and attractive.


This is inside the bar area. It's the tiled area between the counter top and the bar bump-up.  We knew we wanted to tile it and had these really cool hand-made art tiles from Cuba. (Another hand-me-down from my MIL.)  She had these in a garage sale, but I snagged them.  I'd been looking for some neat way to use them and when we started this tile job--inspiration hit.  We used the black pencil liner tile on the bottom to eliminate the need to cut the glass tiles lengthwise, and it provides a neat accent.  And the 1x1 brown tiles are Emprador Dark Marble leftover from our kitchen and hearth room fireplace remodels. The addition of those tiles was a last minute decision as I was waiting for Ryan to cut some glass tiles for me with the saw.

I like this so much because it's such a neat surprise.  You won't ever see it unless you come behind the counter and look for it.


It's turned out to be such a great and useable space. I'm REALLLY glad we redid this one!  

If you didn't already, don't forget to check out the Before and Afters and pictures of the "wine cellar" and oven HERE.

The Office and a Major Award

Okay. First things first.

I won a Major Award! I think it may be our shared secretive geekiness, but Bub at I'd Like To Hold a Tarantula (who, BTW, cracks me up) awarded me this.


Thanks!


There are some rules involved in my acceptance of this Major Award, which I fully intend to follow, but I have to share the Office NOW! Thus, I will devote my next post to my Major Award. (also allowing me to discuss my Major Award again.)

For today, on to the OFFICE!

Remember, we had unfinished basement that became this.


And now THIS!


and THIS!


and THIS!


and THIS!


After we replace Ryan's chair in the Family Room, his chair will move to the Guest Room and replace a Wing Back Chair, which will fill this corner along with a side table. But, that will have to wait.

We also made this


There were four separate metal squares from Old Time Pottery - $4.99 each. I brought them home and Ryan riveted them together. I couldn't find any cute magnets, so made these out of magnet tape and doodads I had around. It works great, and I really like it!

And now, instead of looking at a furnace, I get to look at this!


Much nicer.

Ryan finished tiling and grouting the hall extension today, so we can call the carpet guy to finish all that up. Then we just need to hang doors and trim and get a few more accessories for the office and then this project will be complete.

It's so nice to have the office clean and functional. oh....and I do still need to organize....well, it might happen - right?

Linked to MetMon at Between Naps on the Porch
and
FIF!

I may be the only one that cares

WARNING! Computer Geekery and Cabling Follow.

My KVM Extender came! My KVM Extender came!

NOTE: KVM stands for Keyboard, Video Display (or Monitor) and Mouse

It was last Friday. The UPS guy dropped it off 20 minutes before we were supposed to head to Grand Lake for a family reunion. No time to hook it up. GRRRRRR! We got home Monday evening and then I got SLAMMED at work. Double GRRRRRR!

But, with Tanner's help and patience, everything is now hooked up. And, while we are still having technical difficulties, it's a dream.

This is the KVM extender after I unpackaged it. I think it's really cool.


Turns out you can also use this to have TWO KVM stations running off of one PC - One could be in the kitchen and one could be anywhere you could get the wire to--as long as it's less than 328 feet. Neat, but, that's not how we used it.

I set up the keyboard, monitor and mouse on my desk and plugged them all into the REMOTE piece of the extender, which I placed Under the desk.


The Orangey-yellow Cat5 cable runs through the wall and to the closet--like the red line depicted here:(The blue lines are supposed to be the cable and telephone lines coming from the street.)


The orangey-yellow Cat5 plugs into a LOCAL piece of the Extender, which looks almost identical to the REMOTE piece.

A cable runs out of the LOCAL piece that plugs into the KVM ports on the back of your computer OR, in my case into this KVM Switch.


The KVM switch allows me to use the same Keyboard/Monitor/Mouse for two different computers. I just have to switch between computers, so I can't be using them at the same time. (but they can be on at the same time.) Out of the KVM switch comes TWO cables, which each have plugins for the Keyboard/Monitor/Mouse. I plug one into my home computer and one into my Work Computer...sort of.

Because my work computer is a laptop, (and I don't do well typing on the laptop keyboard and I need a larger monitor) I actually plug the second KVM cable into a Port Replicator. This is it.


The port replicator has the KVM cables and my work printer all plugged into it, and then ONE USB cable comes out of it. That USB cable plugs into my Laptop. (I have the same Port Replicator in my other office.) Like this:


This means, when moving between offices, all I have to do is plug the Laptop into Power and one other cable, rather than all the cables that go into the Port replicator. It just makes things a little easier.

Here's a rough drawing of it all.

Red = Cat5
Pink = USB Cable
Purple = KVM Cable
Blue = Telephone cable (the red cable to my work phone is correct, it's a VOIP phone)
Brown = Cable cable


wow. If you made it this far, drinks on me! But, totally worth it. Right?

Now ALL that crap is in the CLOSET! YAY! And I have no crap on my desk.

Note to Bub: Don't say it!!!!!

Done with the Geekery!

Pretty pictures in next post.

I promise!

Another post about Extensions, this time the KVM kind

I look at all those fabulous offices in Ballard Designs and such; how do they do it? I'm not talking about the design, which is gorgeous.

I'm talking about where do they put all their crap?


First the books.

They have the attractive, leather bound kind.

I have the dog-eared-neon-yellow-Dummies Guide to SQL or the Fat Spiral Gregg Reference kind. Not to mention the mismatched-Binder-holding-various-reports kind.

Computer Equipment.

They have a laptop. Or, at the most, a monitor, keyboard and mouse.

I have two printers, a fax, a scanner, the modem and router, the PC, a laptop, an adding machine, home phone, VOIP work phone, port replicator, and of course the keyboard, mouse and monitor.

The Decor.

They have Giclee prints, handcrafted acanthus message boards and animal print file folders

I have sticky notes, manilla folders and arts & crafts created by my children.

The MONEY

They have $129 to spend on a desk organizer.

I have a house payment.

The REALITY

I can't do much about the money, BUT, I am working on the hiding of the crap.

First, Ryan built a closet in the office where I planned to house the printers, scanners and such by running USB cables through the wall by the desk into the closet to connect everything. Except, a USB cable max length is 16.4 feet. I need 20-25 feet. My first reaction was "well, shit."

Now there are ways to extend the cable, yes, however, we found an even BETTER solution.

A KVM extender! Just over 100 bucks at monoprice.com.

It allows you to plug your Keyboard, Monitor and Mouse into a little box. Attached to that little box is a CAT 5 cable - technical maximum length 328 feet! You run that cable to another little box (Mine will be inside the closet). Out of THAT little box are the Keyboard, Monitor and Mouse cables, which you then plug into your PC - OR, in my case, into a KVM switch, which allows me to use my Keyboard, Monitor and Mouse for either my PC or my laptop, using a keyboard hot key to make the switch. (Scroll Lock, Scroll Lock, Down Arrow).

Here's my fancy interpretation of how the KVM extender works.


Why am I so handspring-happy about this - aside from my natural geekish tendencies?

This means ALL my crap will be IN THE CLOSET! On my desk will only have to be Keyboard, Mouse and Monitor, the first part of the KVM extender, my adding machine, my work phone and my home phone. That's it! WAY cool. Almost like the fancy office people's homes in the Designer Photos.

Monoprice sent me an email and said the extender shipped yesterday! I hope to have it before Friday. And will be sure to share all my wiring.

tee hee! I'm loving it!

Extensions and Breaking Down Walls

Since Ryan is finishing an Office downstairs (YAY!), we decided to also extend the hall on the other side of the basement. Someday down the road there will be a bedroom off that hall. It made sense to get it completed now since we were cutting into the wall for the office. After the hall extension and the office are done, any future dirty, dusty, drywalling projects will be behind closed doors.

Plus, Ryan really wanted a place for his Dartboard.

This is looking down the hall into the unfinished area, which will one day be a Bedroom to the Left and remain Unfinished for the Workshop to the Right.


This is where Ryan started the framing of the Hall Extension. He hasn't torn down the original door yet.


This is inside the Unfinished area where the Workshop is and where the Bedroom will be someday. These are the studs that are forming the end of the hall pictured above. The door closest to you is the door that was on the Right and will be the door to the workshop - opposite, will be the door to the future bedroom, and is the door that was on the Left. When we get around to finishing the space, we will build a wall to separate the two areas.


And here is the new extended hall.

* The first door on your left is new. Ryan cut the doorway and finished the unused area underneath the staircase for new CLAIMED storage.
* The next door to your left will someday go to the Bedroom.
* The first door on your right, where Sonic the Cat is, goes to the bathroom.
* And the Second door on your left goes to the workshop.
* The dartboard will hang proudly at the end of this hall.


Seeing these kinds of projects blows my mind. It makes me realize that you can really do ANYTHING when it comes to redoing and remodeling. We aren't limited by the walls that are around us.

And check this out.

In those first few pictures, where you can see the exterior wall all covered in plastic and insulation. I stood with my back against that wall and took this picture into the Family Room.


In this picture, I am standing in the EXACT same spot, facing the backside of the end of the new hall! CRAZY!

Linked to Met Monday.

Once upon a time, in an unfinished basement far away...

It's getting exciting around here! At least for me.

I have a full-time job where I am fortunate to work from home about 70% of my time. Before we moved, I had a great home office that was PERFECT. In the new house, there have been so many MUST DO and REALLY MAKES MORE SENSE TO DO projects that we kept putting off finishing a space for the office. And, because of my work, I need to be behind closed doors; thus, I have been working in different parts of the Unfinished basement.

Right now I am shoved into the room with the Furnace and Hot Water Heater. It's MAYBE 4 1/2 feet deep, so I keep banging into the door knob behind me. Here! I just swiveled around in my chair and took pictures to the left and right, front and rear.


Go ahead Fergie, say it! It's G-L-A-M-O-R-OUS! But not much longer!

What was Unfinished basement became this:


Then THIS!


Pete (our FABULOUS mud and tape guy) completed the drywall finish today and Harper and Savannah volunteered to help me with some painting. These wonderful ladies did almost ALL of the Wall priming. Thanks, ladies!


It shouldn't be much longer!

Rocks, Broken Hot tubs and Backyard Hardscaping

It's so very hot outside right now. I've been watering the container plants twice a day, but that's about all the outside I can stand. I miss hanging out there.

The backyard was an icky mess for starters. It consisted of a small patio, a river rock bed and a broken hot tub. Oh, and lots and lots of weeds. Interestingly enough, the poison ivy appeared to confine itself to the Professional Landscaping in the Front Yard? Go figure. We moved the rock to the side and the front of the house and had two patios and a sidewalk poured.

The first patio is here. It's under the deck and Ry installed an outdoor ceiling fan, which makes a tremendous difference. We also have this great gas firepit from Costco. It's super comfy and runs off of a regular propane tank, which is hidden in the table.


In the area between this new patio and the pre-existing patio, we chose to leave open for landscaping. We installed this stone pathway to link the two areas. Other than the obvious VERY HEAVY rocks, this was pretty simple.


Luckly, since we had already moved the river rock, there was really not a lot but hard, clay dirt to dig up. We dug out the pathway about 4 inches and then installed metal edging to "outline" the path". Next, we put in a thin layer of sand and then laid in our rocks, jigsaw-puzzle-like. That was the hardest part - moving those around to get them to fit just so. Then we filled in the spaces between the rock with pea gravel. Next, we mulched around the path and then pulled up the metal edging, which we reused in other landscaping.


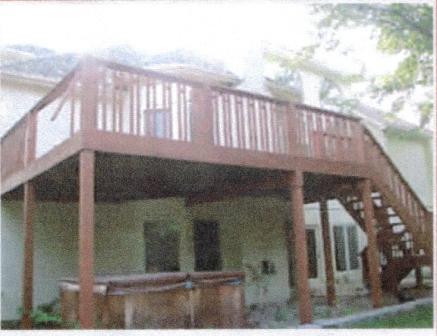
This is the second patio. We poured it for the previouly broken hot tub, which Ryan fixed AND redid all the sides so it looks pretty again. You can see where the older patio ends and the new one begins. One day we may stain or do an overlay, or just wait patiently for it all to naturally color? We shall see...


A view from the other side.


This fall we hope to build an arbor over the hot tub, with a stone wall facing toward the woods.

This is the original patio on the back of the house.


We struggled with the placement of the furniture, as the patio is on the small side. This works really well. Behind the loveseat, the crank out window can still open, and there is plenty of space to walk out the back door between the loveseat and the chair. But it's still all close enough for easy conversation.

And here's a picture where I try to capture it all. There is a slope and lots of trees behind the house, so I can't get a photo that shows the entire project.

But, you can see where we finished off some landscaping around the patios and under the deck. We also placed a water fountain to the right of the firepit group, which is very nice. And we put a heater in it and leave it on in the winter. We've gotten over 20 birds splashing around in it! We also refinished the deck.


The plantings around the decks include:
Hosta, Iris, Peony, Lilies, Vinca (annual), Daffodils, Aster, Chrysanthemum, Chives, Oregeno, Thyme, Solomon's Seal, Yarrow, Fern, Heuchera, Gladiolas, Surprise Lily, Nandinia, Wild Onion, Clematis, Catnip, Geranium, Zinnia, Ferns, some Tropicals, Morning Glory and a variety of stuff in pots.

I am still struggling with getting a handle on the light and moisture around the entire house...Live and Learn!