
Showing posts with label diy. Show all posts
Showing posts with label diy. Show all posts


Laundry Room Redo
We finished redoing the Laundry Room!

This is the before. What you can’t see here is the blue countertop, the scratched up sink, the damaged walls or the stained, peeling, disgusting linoleum floors. You also can’t see inside the cabinet where previous homeowners scrawled
BLOCKBUSTER 785-4652
and
BANK OF AMERICA 800-468-5000 #1850-68775499
in Black Sharpie marker. No kidding.
It was amazing to me what the simple addition of the molding on the cabinets made.

There was this wasted space between the door to the room and the washing machine—like a closet with no door. There was a clothes rod that hung on the bottom portion of the white framing below. (I failed to get a before picture) We use the rod for drying clothes, and wanted to raise it up to allow for hanging clothes space after we added built in shelves. We talked about ripping out the wood support, but then would have to contend with patching the walls. Ryan had the great idea to just “beef” up the framing. He added a 2x10 and then a 2x4 and attached decorative trim.

It gives it a cabinetry feel and it also made a great place to display this 1916 Singer sewing machine that belonged to my grandmother.

the space below the rod was empty. We kept a laundry hamper here.

Based on this inspiration, http://pinterest.com/pin/37999190575828656/, we built this.

Ryan says it’s working great!
We also replaced the countertop, sink and faucet and tiled the backsplash. We tiled the floor, did wall repair and added bead board to each side of the room and added molding to the top of the cabinets.

The tile was a great find. Costco for $5.55 a square foot. It has travertine, glass and emperador dark marble. The SAME marble that we used as an accent in the kitchen backsplash and to tile the fireplace in the Hearth Room: the areas that adjoin the Laundry!
And the countertop? $40 at Sutherlands! It was the last piece they had. We use the galvanized bucket on the counter to keep our dust rags in.

We are super pleased with the end result.
Growing Herbs in a Strawberry Pot
I like using fresh herbs and have found growing the perennial sort pretty painless. I’ve had luck with Oregano, Sage, Thyme, Catmint and Chives in the garden. Easy-to-grow, I’ve just stuck these in the dirt and kept them watered. I’ve found regular Mint to be entirely too invasive, so will grow it in a pot.
For the Annual Herbs, I’ve had good luck using a Strawberry Pot on the deck. It takes up very little space and gives you tons of fresh herbs. But in the heat of the summer, I have some trouble keeping everyone evenly watered. Solution? PVC Pipe.
Start with a Strawberry Pot.

Cut a piece of PVC Pipe a couple inches taller than your pot and drill some holes in it. Also, with PVC glue, attach an end cap. (I didn’t do this the first year, and the water would just run out of the bottom of the pot.)

Stick the pipe in the middle of the pot and start filling with dirt. (If you like, you can use rocks or broken pieces of a pot for drainage at the bottom). Fill with dirt up to the first level of holes in your strawberry pot.

Place your herbs in the first layer of holes and then keep going. If you like, you can add slow release fertilizer and/or water crystals as you go. I also plant the identification tags that come with the herbs next to them in the pot. This helps me see what’s what. This part also gets messy; it can help to do this over an old bedsheet or towel to contain the soil.

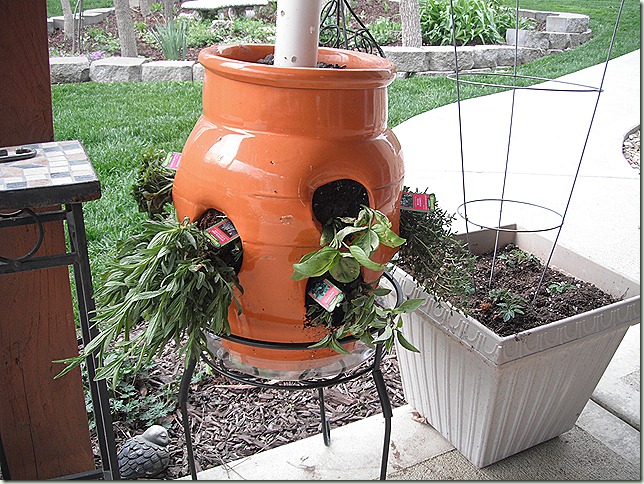
When you water, just pour into the PVC pipe until it’s full.
Here is the finished pot two months into the summer. Kept right outside the kitchen door, I have easy access to fresh herbs all summer long.

For the Annual Herbs, I’ve had good luck using a Strawberry Pot on the deck. It takes up very little space and gives you tons of fresh herbs. But in the heat of the summer, I have some trouble keeping everyone evenly watered. Solution? PVC Pipe.
Start with a Strawberry Pot.

Cut a piece of PVC Pipe a couple inches taller than your pot and drill some holes in it. Also, with PVC glue, attach an end cap. (I didn’t do this the first year, and the water would just run out of the bottom of the pot.)

Stick the pipe in the middle of the pot and start filling with dirt. (If you like, you can use rocks or broken pieces of a pot for drainage at the bottom). Fill with dirt up to the first level of holes in your strawberry pot.

Place your herbs in the first layer of holes and then keep going. If you like, you can add slow release fertilizer and/or water crystals as you go. I also plant the identification tags that come with the herbs next to them in the pot. This helps me see what’s what. This part also gets messy; it can help to do this over an old bedsheet or towel to contain the soil.


When you water, just pour into the PVC pipe until it’s full.
Here is the finished pot two months into the summer. Kept right outside the kitchen door, I have easy access to fresh herbs all summer long.

Replacing and Centering a Light
When we moved in, the main light in the Dining Room and the niche for the buffet were each centered on different parts of the room. And it drove me crazy. You can kind of see in this photo how the table is centered on the buffet, but the light is not centered over the table.

Turns out there is a bedroom immediately over this room, so we had no real access to the space in the ceiling. But, when we replaced this light

with this light in the entry,

I knew that when Ryan centered the Dining Room light, I wanted him to swap it out with the old Entry Way light.
This weekend, he went to work.
We moved the furniture, threw down some old sheets, took down the original Dining Room light and started measuring. After we decided where the new light would go, Ryan cut a new hole


When that was done, he used this from Home Depot.

It slips into the new hole and tightens (like a tension rod for a shower curtain) until it “bites” into the joists for support. The electrical box is then attached to it, pulling the wires from the old hole through the new.

We’d taken the light apart, too, for easier hanging. That sucker was heavy!
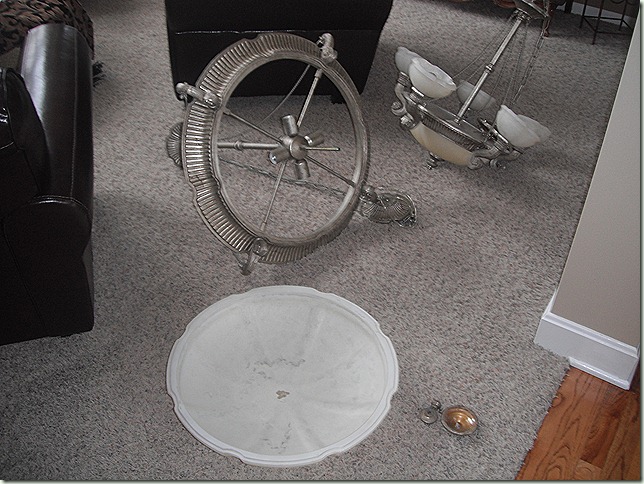
But not nearly as heavy as the replacement light in the Entry. Wow!
And we also used a medallion from Lowe’s so that we could hide the old hole. Much easier and cheaper than repairing the ceiling, and I really like the look.

And here she is all put back together. And centered at last!


My mom came by and was NOT blown away by the change, but I love it!
Linked to Savvy Southern Style

Turns out there is a bedroom immediately over this room, so we had no real access to the space in the ceiling. But, when we replaced this light

with this light in the entry,

I knew that when Ryan centered the Dining Room light, I wanted him to swap it out with the old Entry Way light.
This weekend, he went to work.
We moved the furniture, threw down some old sheets, took down the original Dining Room light and started measuring. After we decided where the new light would go, Ryan cut a new hole


When that was done, he used this from Home Depot.

It slips into the new hole and tightens (like a tension rod for a shower curtain) until it “bites” into the joists for support. The electrical box is then attached to it, pulling the wires from the old hole through the new.

We’d taken the light apart, too, for easier hanging. That sucker was heavy!

But not nearly as heavy as the replacement light in the Entry. Wow!
And we also used a medallion from Lowe’s so that we could hide the old hole. Much easier and cheaper than repairing the ceiling, and I really like the look.

And here she is all put back together. And centered at last!


My mom came by and was NOT blown away by the change, but I love it!
Linked to Savvy Southern Style
Outdoor Decor - Potted Trees and Shrubs
I was reading Crystal Coast Gardener yesterday, and Kyna mentioned she had gotten a Japanese Maple on the cheap and was trying to decide where to plant it. I suggested keeping it in a pot for a few years. We've done this with several trees and shrubs. Not only have we had success, but it's also a great (and Cheap!) way to dress up your outdoor spaces.
This is a Contorted Willow on the upper deck. This was FREE! It started out as a clipping from Ryan's uncle, which was rooted in water and grown by my mom to a good size. It's been repotted a few times and is close to 20 feet tall. Two good things about raising this one in a pot: 1. we were able to move it when it was in a spot that got too much sun and 2. it requires a lot of water and having it on the deck helps me remember to keep it watered well.

This one is a Maple. It started out as a stick from the Arbor Day Foundation and was a gift(?) from my MIL. Sadly, out of that bunch, this is the only one that made it.

We have several of these guys. It's an Emerald Green Arborvitae. Got it at Lowe's two years ago. Regular price $6.98. End of season clearance 50 cents. These grow to be 15 feet tall and 4 feet wide. The plan is to replant into larger pots every 2-3 years.


We leave the plants out all winter, and I try to water about every 6 weeks. We are in the Midwest, Hardiness zone 5/6 and will get some temps below 0 degrees Fahrenheit with an annual average snowfall of 20 inches. If we are having a particularly good cold spell, I'll move the pots so they are right next to the house, but have never brought them in.
So, for very little cash, we have plants for our outdoor spaces. Plus, it's fun to nurture these little guys.
And while I was out taking pictures, I had to throw in these.
My Black Magic Elephant Ears! Aren't they doing great?

And my coleus. It was so slow to start, but once it took off, it's been doing great!

This is a Contorted Willow on the upper deck. This was FREE! It started out as a clipping from Ryan's uncle, which was rooted in water and grown by my mom to a good size. It's been repotted a few times and is close to 20 feet tall. Two good things about raising this one in a pot: 1. we were able to move it when it was in a spot that got too much sun and 2. it requires a lot of water and having it on the deck helps me remember to keep it watered well.

This one is a Maple. It started out as a stick from the Arbor Day Foundation and was a gift(?) from my MIL. Sadly, out of that bunch, this is the only one that made it.

We have several of these guys. It's an Emerald Green Arborvitae. Got it at Lowe's two years ago. Regular price $6.98. End of season clearance 50 cents. These grow to be 15 feet tall and 4 feet wide. The plan is to replant into larger pots every 2-3 years.

These are some small "starters". Another Arborvitae, some kind of Cedar and in the third pot, there are three trees--all volunteers--the large maple, a much smaller redbud, and one more, even smaller, maple. Next spring, I'll move the redbud and tiny maple to their own pots.

We leave the plants out all winter, and I try to water about every 6 weeks. We are in the Midwest, Hardiness zone 5/6 and will get some temps below 0 degrees Fahrenheit with an annual average snowfall of 20 inches. If we are having a particularly good cold spell, I'll move the pots so they are right next to the house, but have never brought them in.
So, for very little cash, we have plants for our outdoor spaces. Plus, it's fun to nurture these little guys.
And while I was out taking pictures, I had to throw in these.
My Black Magic Elephant Ears! Aren't they doing great?

And my coleus. It was so slow to start, but once it took off, it's been doing great!

My most favorite...about the bar
We redid the Family Room Bar this Winter/Spring. Here are the Before and Afters and pictures of the "wine cellar" and oven HERE.
We are using this space much more than we imagined. We've even used the oven a ton. Here are some of my favorite things about it right now.
First, the glass tile we chose as the back splash. Can you see how it catches the light. It's really lovely. I also love these corbels. They were reclaimed from my Mother-in-Law's house when she pulled them out of a bathroom. They sat in her flower shed for several years and were headed for the dumpster. They were dirty and had spider sacks on them. We cleaned them up and held on to them for the perfect project. Here, they simply got a new paint job and then were installed.


If you didn't already, don't forget to check out the Before and Afters and pictures of the "wine cellar" and oven HERE.
We are using this space much more than we imagined. We've even used the oven a ton. Here are some of my favorite things about it right now.
First, the glass tile we chose as the back splash. Can you see how it catches the light. It's really lovely. I also love these corbels. They were reclaimed from my Mother-in-Law's house when she pulled them out of a bathroom. They sat in her flower shed for several years and were headed for the dumpster. They were dirty and had spider sacks on them. We cleaned them up and held on to them for the perfect project. Here, they simply got a new paint job and then were installed.

Now, one might argue that this is Ryan's favorite part. We built this for wine storage and to display different whiskeys and bourbons. ( I still don't know the difference between the two.) It turned out just as we designed it. Below this is a cabinet and wine chiller. This area is functional and attractive.

This is inside the bar area. It's the tiled area between the counter top and the bar bump-up. We knew we wanted to tile it and had these really cool hand-made art tiles from Cuba. (Another hand-me-down from my MIL.) She had these in a garage sale, but I snagged them. I'd been looking for some neat way to use them and when we started this tile job--inspiration hit. We used the black pencil liner tile on the bottom to eliminate the need to cut the glass tiles lengthwise, and it provides a neat accent. And the 1x1 brown tiles are Emprador Dark Marble leftover from our kitchen and hearth room fireplace remodels. The addition of those tiles was a last minute decision as I was waiting for Ryan to cut some glass tiles for me with the saw.
I like this so much because it's such a neat surprise. You won't ever see it unless you come behind the counter and look for it.

It's turned out to be such a great and useable space. I'm REALLLY glad we redid this one!
If you didn't already, don't forget to check out the Before and Afters and pictures of the "wine cellar" and oven HERE.
Linked to Remodelaholic Friday.
The Office and a Major Award
Okay. First things first.
I won a Major Award! I think it may be our shared secretive geekiness, but Bub at I'd Like To Hold a Tarantula (who, BTW, cracks me up) awarded me this.

There are some rules involved in my acceptance of this Major Award, which I fully intend to follow, but I have to share the Office NOW! Thus, I will devote my next post to my Major Award. (also allowing me to discuss my Major Award again.)
For today, on to the OFFICE!
Remember, we had unfinished basement that became this.

And now THIS!

and THIS!

and THIS!

and THIS!

After we replace Ryan's chair in the Family Room, his chair will move to the Guest Room and replace a Wing Back Chair, which will fill this corner along with a side table. But, that will have to wait.
We also made this

There were four separate metal squares from Old Time Pottery - $4.99 each. I brought them home and Ryan riveted them together. I couldn't find any cute magnets, so made these out of magnet tape and doodads I had around. It works great, and I really like it!
And now, instead of looking at a furnace, I get to look at this!

Much nicer.
Ryan finished tiling and grouting the hall extension today, so we can call the carpet guy to finish all that up. Then we just need to hang doors and trim and get a few more accessories for the office and then this project will be complete.
It's so nice to have the office clean and functional. oh....and I do still need to organize....well, it might happen - right?
Linked to MetMon at Between Naps on the Porch
and
FIF!
I won a Major Award! I think it may be our shared secretive geekiness, but Bub at I'd Like To Hold a Tarantula (who, BTW, cracks me up) awarded me this.

Thanks!
There are some rules involved in my acceptance of this Major Award, which I fully intend to follow, but I have to share the Office NOW! Thus, I will devote my next post to my Major Award. (also allowing me to discuss my Major Award again.)
For today, on to the OFFICE!
Remember, we had unfinished basement that became this.

And now THIS!

and THIS!

and THIS!

and THIS!

After we replace Ryan's chair in the Family Room, his chair will move to the Guest Room and replace a Wing Back Chair, which will fill this corner along with a side table. But, that will have to wait.
We also made this

There were four separate metal squares from Old Time Pottery - $4.99 each. I brought them home and Ryan riveted them together. I couldn't find any cute magnets, so made these out of magnet tape and doodads I had around. It works great, and I really like it!
And now, instead of looking at a furnace, I get to look at this!

Much nicer.
Ryan finished tiling and grouting the hall extension today, so we can call the carpet guy to finish all that up. Then we just need to hang doors and trim and get a few more accessories for the office and then this project will be complete.
It's so nice to have the office clean and functional. oh....and I do still need to organize....well, it might happen - right?
Linked to MetMon at Between Naps on the Porch
and
FIF!
I can almost taste it!
Friday Night we put the carpet down!

Then Saturday while I painted this

Ryan and Tanner hung doors, put up the ceiling fan, installed the baffles, and finished up the electricity.

Then Saturday while I painted this

Ryan and Tanner hung doors, put up the ceiling fan, installed the baffles, and finished up the electricity.


Once upon a time, in an unfinished basement far away...
It's getting exciting around here! At least for me.
I have a full-time job where I am fortunate to work from home about 70% of my time. Before we moved, I had a great home office that was PERFECT. In the new house, there have been so many MUST DO and REALLY MAKES MORE SENSE TO DO projects that we kept putting off finishing a space for the office. And, because of my work, I need to be behind closed doors; thus, I have been working in different parts of the Unfinished basement.
Right now I am shoved into the room with the Furnace and Hot Water Heater. It's MAYBE 4 1/2 feet deep, so I keep banging into the door knob behind me. Here! I just swiveled around in my chair and took pictures to the left and right, front and rear.

Go ahead Fergie, say it! It's G-L-A-M-O-R-OUS! But not much longer!
What was Unfinished basement became this:

Then THIS!

Pete (our FABULOUS mud and tape guy) completed the drywall finish today and Harper and Savannah volunteered to help me with some painting. These wonderful ladies did almost ALL of the Wall priming. Thanks, ladies!

It shouldn't be much longer!
I have a full-time job where I am fortunate to work from home about 70% of my time. Before we moved, I had a great home office that was PERFECT. In the new house, there have been so many MUST DO and REALLY MAKES MORE SENSE TO DO projects that we kept putting off finishing a space for the office. And, because of my work, I need to be behind closed doors; thus, I have been working in different parts of the Unfinished basement.
Right now I am shoved into the room with the Furnace and Hot Water Heater. It's MAYBE 4 1/2 feet deep, so I keep banging into the door knob behind me. Here! I just swiveled around in my chair and took pictures to the left and right, front and rear.

Go ahead Fergie, say it! It's G-L-A-M-O-R-OUS! But not much longer!
What was Unfinished basement became this:

Then THIS!

Pete (our FABULOUS mud and tape guy) completed the drywall finish today and Harper and Savannah volunteered to help me with some painting. These wonderful ladies did almost ALL of the Wall priming. Thanks, ladies!

It shouldn't be much longer!
Subscribe to:
Posts (Atom)