
Showing posts with label brown period. Show all posts
Showing posts with label brown period. Show all posts


What Gran Gran gave me
Work has been INSANE busy….I have to keep reminding myself that I love my job. And I do, but I am missing the bloggy world. I’ve only been able to visit 1-2 blogs each day, and then just for a quick look through. I have really been surprised at myself by how much I enjoy seeing what other people are cooking, fixing, creating or just doing. That sharing and connecting is really cool. Thanks to everyone that takes the time to share.
And, on to some sharing of my own! Ever since we finished the office, I’ve been looking for some kind of bookcase or something for one of the walls. While I was visiting my grandmother in Jasper, Arkansas, I saw this great piece she had stuck in the corner of her basement and was using for storage. I asked her if she would loan it to me, and she said YES!
But, alas, it wouldn’t fit in our car for the ride home. So, my super sweet mother arranged to get it the last time she was visiting and bring it to our home. How great is that!?!

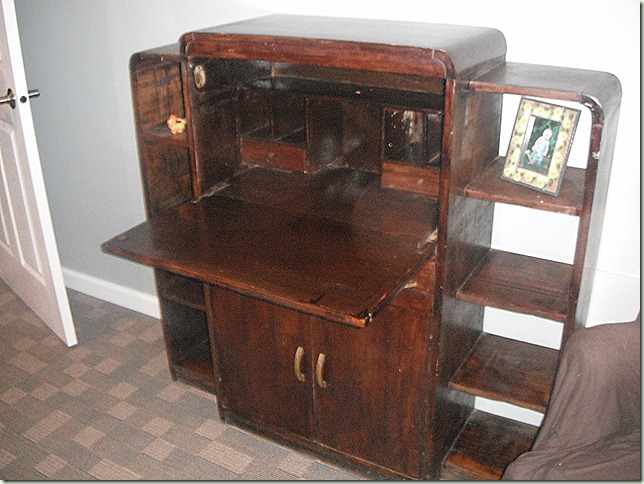
It is in need of more work than I originally thought when it was covered with items in Gran’s basement. The original(?) finish is full of runs and uneven spots and then it’s faded and dinged in spots, too, but the size and look of it is EXACTLY what I wanted. And even better, now I have a project!. Ryan thinks we should paint it, but I’m really considering stripping it and staining it. I really like the current color, and was hoping some clean up and Liquid Gold would save the finish, but that’s not going to fly.
What do you think? Paint? Strip? Embrace the drips, fades and imperfections and do nothing?
And, on to some sharing of my own! Ever since we finished the office, I’ve been looking for some kind of bookcase or something for one of the walls. While I was visiting my grandmother in Jasper, Arkansas, I saw this great piece she had stuck in the corner of her basement and was using for storage. I asked her if she would loan it to me, and she said YES!
But, alas, it wouldn’t fit in our car for the ride home. So, my super sweet mother arranged to get it the last time she was visiting and bring it to our home. How great is that!?!


It is in need of more work than I originally thought when it was covered with items in Gran’s basement. The original(?) finish is full of runs and uneven spots and then it’s faded and dinged in spots, too, but the size and look of it is EXACTLY what I wanted. And even better, now I have a project!. Ryan thinks we should paint it, but I’m really considering stripping it and staining it. I really like the current color, and was hoping some clean up and Liquid Gold would save the finish, but that’s not going to fly.
What do you think? Paint? Strip? Embrace the drips, fades and imperfections and do nothing?
Sewing some Custom Curtains
There are gorgeous windows on the back of the house, especially in the Living Room. But they MUST have curtains to block the sun during the hottest part of the day. Luckily, there are enough trees to provide some shade, as I have no clue how I would cover the really big windows on top.
Here's the windows and curtains before we moved in.

I was lucky enough to find THESE curtains at JC Penney Outlet. They were having a 75% off sale on curtains AND I was shopping with my mom. She, of course, had coupons for an additional 15% OFF. Love HER! Thanks, mom! So, we got these curtains for about $50!

While I really love these curtains, Ryan and I both felt the room needed more...Something?
AGAIN, I get to turn to my fabulous SIL at Modus Operandi Designs, and she suggested something "beefier" and also suggested raising the curtains to just below the big Palladian windows. (I pay her back in wine and Chiefs tickets. I wonder how that's working out for her, because it's working out GREAT for me!)
The don't make "off the rack" curtains in the length I needed: about 105". Custom was going to cost me a minimum of $3500. Another option is "made-to-length" curtains, which would cost a minimum of $1800 for what we want. (These prices ONLY include the curtains, not the hardware)
SEW, I get out the sewing room, which consists of me dragging my sewing machine and ironing board out into the middle of the Family Room (which, you KNOW Ryan just LOVES.)
Pluses to working in the Family Room?
1. It encourages me to finish up the project quickly, since all my crap is in the way.
2. I get to iron while I am watching TV!
First, I ironed in double hems on the tops and sides and then stitched them. This could also be done with double sided Ironing tape with no problem. In fact, that could have saved some time, as I was ironing anyway. The ironing process would take a bit longer to get everything heated well enough to bond, but there would be no sewing.
We bought some nice, heavy wood rods and rings and installed those. (Cost: about $150) Then, after the top and side hems were complete on the curtains, at my mom's suggestion (still loving her!), I hung each panel and pinned the bottom hem in place. Since we open and close these curtains daily, I didn't want any puddling on the floor.
 After pinning, I ironed in the double hem and stitched again! And then hung them all.
The LONG TIME Before:

The Middle Before:

And the AFTER:

And then just one more picture with them open!

Raising the curtains makes the room feel more substantial and raises your eye up, where before it stopped at the top of the old curtains. And the heavier rods make more of a statement, too. AND, we were able to reuse the OLD curtains downstairs in the Family Room! YAY! I'll post that pic soon!
Funny side note: Ry and I thought we were really going out there on the color of the curtains. They have ORANGES and GREENS and even TURQUOISE BLUE in them! Once hung??.......they look pretty BROWN...HAH!
Here's the windows and curtains before we moved in.

I was lucky enough to find THESE curtains at JC Penney Outlet. They were having a 75% off sale on curtains AND I was shopping with my mom. She, of course, had coupons for an additional 15% OFF. Love HER! Thanks, mom! So, we got these curtains for about $50!

While I really love these curtains, Ryan and I both felt the room needed more...Something?
AGAIN, I get to turn to my fabulous SIL at Modus Operandi Designs, and she suggested something "beefier" and also suggested raising the curtains to just below the big Palladian windows. (I pay her back in wine and Chiefs tickets. I wonder how that's working out for her, because it's working out GREAT for me!)
The don't make "off the rack" curtains in the length I needed: about 105". Custom was going to cost me a minimum of $3500. Another option is "made-to-length" curtains, which would cost a minimum of $1800 for what we want. (These prices ONLY include the curtains, not the hardware)
SEW, I get out the sewing room, which consists of me dragging my sewing machine and ironing board out into the middle of the Family Room (which, you KNOW Ryan just LOVES.)
Pluses to working in the Family Room?
1. It encourages me to finish up the project quickly, since all my crap is in the way.
2. I get to iron while I am watching TV!

We waited until Jo-Ann Fabric had their 54" Decorator Fabric on sale. We got the fabric at 65% off: bringing our total spent to just under $300. Still a lot, but a significant savings over full price and a HUGE savings over having someone else make them. I also asked the clerk at Jo-Ann to cut my fabric into four equal pieces, which saves me time AND they cut very straight at Jo-Ann. Me...? Not so straight.
First, I ironed in double hems on the tops and sides and then stitched them. This could also be done with double sided Ironing tape with no problem. In fact, that could have saved some time, as I was ironing anyway. The ironing process would take a bit longer to get everything heated well enough to bond, but there would be no sewing.
We bought some nice, heavy wood rods and rings and installed those. (Cost: about $150) Then, after the top and side hems were complete on the curtains, at my mom's suggestion (still loving her!), I hung each panel and pinned the bottom hem in place. Since we open and close these curtains daily, I didn't want any puddling on the floor.
 After pinning, I ironed in the double hem and stitched again! And then hung them all.
The LONG TIME Before:

The Middle Before:

And the AFTER:

And then just one more picture with them open!

Raising the curtains makes the room feel more substantial and raises your eye up, where before it stopped at the top of the old curtains. And the heavier rods make more of a statement, too. AND, we were able to reuse the OLD curtains downstairs in the Family Room! YAY! I'll post that pic soon!
Funny side note: Ry and I thought we were really going out there on the color of the curtains. They have ORANGES and GREENS and even TURQUOISE BLUE in them! Once hung??.......they look pretty BROWN...HAH!
Dining Room ReDo
The Dining Room.
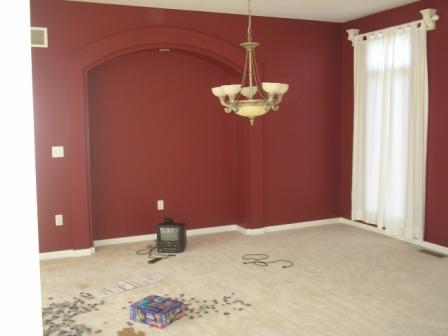
One of the first rooms you see when you walk in the house. Wasn't completely horrible, thus, it was one of the best looking rooms in the whole place. Here she is BEFORE. Note 1: this picture was taken when we were spending all of our spare time here so the kids were setting up games and such in the room. What you can't see are the brown stains on the curtains and the threadbare carpet around the floor vent. We think some previous owners may have had a dog that liked scratching at the vents when the air came on? Note 2: Notice the beginning of my Brown Period, circa 2008.
One of the first rooms you see when you walk in the house. Wasn't completely horrible, thus, it was one of the best looking rooms in the whole place. Here she is BEFORE. Note 1: this picture was taken when we were spending all of our spare time here so the kids were setting up games and such in the room. What you can't see are the brown stains on the curtains and the threadbare carpet around the floor vent. We think some previous owners may have had a dog that liked scratching at the vents when the air came on? Note 2: Notice the beginning of my Brown Period, circa 2008.
 First, we replaced carpet and then painted the room. We were, of course, looking at browns, and my fabulous S-I-L at Modus Operandi Designs selected this one for us.
 Next we got furniture from NFM.
+of+misc+to+file+later+225.jpg) Then we got Plantation Shutters and I made curtains.
Then we got Plantation Shutters and I made curtains. Then we accessorized! Are we done? NO! The next thing is to replace this light with the one that was in the Entry and center it on the niche where the buffet sits. The light is currently centered on the room and just doesn't work for me. And, you know, we were able to swag the light in the Hearth Room over the Kitchen table, but do you think that would work here?
 Also, we tried painting the inside of the niche a different color and it just didn't work. So I went over the same brown with a couple coats of polyurethane. I like the contrast, but still feel like this room needs something?
Lastly, check out these lovelies we got from Cameron's, and the TASSLE!
Subscribe to:
Posts (Atom)