
Click to see some of the details:

Showing posts with label kitchen remodel. Show all posts
Showing posts with label kitchen remodel. Show all posts


Giveaway and Countertops
I’ve learned so much from reading The Granite Gurus blog, and they are sponsoring another really cool giveaway.
As we’ve remodeled and redecorated the house, we’ve chosen different types of finishes for countertops. My all-time favorite is still the Silestone in the kitchen. (Some pics of the big project are here, here and here).

I love the look and feel of the product. It was very comparable in price to granite, and I just love how durable it is. The only maintenance involved is cleaning, and it still looks brand new. The majority of people that come to the house think it’s granite, which is exactly the look we were going for. That’s good, too.
Also in the kitchen is an entertainment Center/Bar, we had done at the same time.

The two smaller side countertops are Black Galaxy granite, and the higher middle countertop is wood.
This is one of my favorite pieces in the house. I love that it is a bar, but not too “bar looking”. In some of the older homes in our neighborhood there are bars in the Living Room…most of them wind up with that ‘70s vibe of polyester, ABBA, shag carpet and swingers…that’s not what we wanted. I hope we pulled it off.
In the Master Bath, we went with a mixture, too. (see some of the BEFORES here and here)

Crema Marfil Marble on the Sink Countertops and Baltic Brown on the Vanity-turned-Morning-Kitchen countertop.

I think the marble is beautiful, but I don’t love the etching of the surface. Even liquid hand soap left on overnight will etch the surface. And while I recognize that is the natural process, it’s not my favorite.
Which I do find interesting, because I enjoy the gradual “distressing” of a hardwood floor….?
The last countertop we’ve redone is the Family Room Bar.
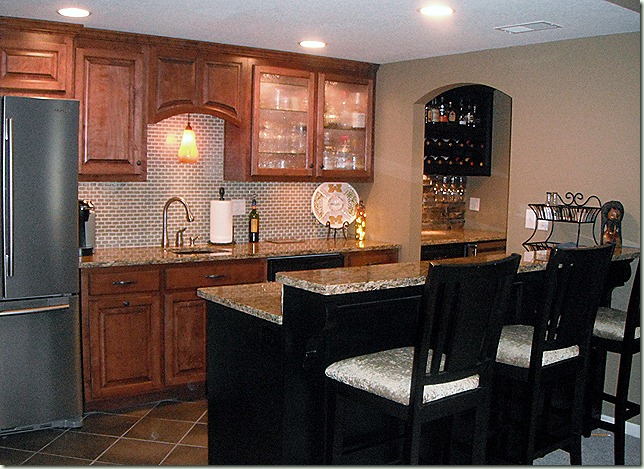
We went with Granite down here, and it is beautiful. We had considered Vetrazzo Alehouse Amber, but at the end of the day, the price was right on the Granite. We use this space a lot: especially the kids. There’s a microwave tucked under the counter and a stove right around the corner of that arched doorway; it works really well when they need to “fend for themselves” for lunch or dinner. As such, the space does get a fair amount of abuse. It’s holding up great, but just doesn’t seem to have quite the same original “Shine” as the Silestone has maintained.
All that being said, in a heartbeat, I would do the Silestone in the kitchen and the Granite in the Bar the exact same way over again. Now, the marble in the Master Bath…? It IS beautiful, and if I was redoing AGAIN, I am not 100% sure I’d go with it again, but, I’m not 100% sure I wouldn’t either. So, there ya go!
Linked to Remodelaholic's Anon.
As we’ve remodeled and redecorated the house, we’ve chosen different types of finishes for countertops. My all-time favorite is still the Silestone in the kitchen. (Some pics of the big project are here, here and here).

I love the look and feel of the product. It was very comparable in price to granite, and I just love how durable it is. The only maintenance involved is cleaning, and it still looks brand new. The majority of people that come to the house think it’s granite, which is exactly the look we were going for. That’s good, too.
Also in the kitchen is an entertainment Center/Bar, we had done at the same time.

The two smaller side countertops are Black Galaxy granite, and the higher middle countertop is wood.
This is one of my favorite pieces in the house. I love that it is a bar, but not too “bar looking”. In some of the older homes in our neighborhood there are bars in the Living Room…most of them wind up with that ‘70s vibe of polyester, ABBA, shag carpet and swingers…that’s not what we wanted. I hope we pulled it off.
In the Master Bath, we went with a mixture, too. (see some of the BEFORES here and here)

Crema Marfil Marble on the Sink Countertops and Baltic Brown on the Vanity-turned-Morning-Kitchen countertop.

I think the marble is beautiful, but I don’t love the etching of the surface. Even liquid hand soap left on overnight will etch the surface. And while I recognize that is the natural process, it’s not my favorite.
Which I do find interesting, because I enjoy the gradual “distressing” of a hardwood floor….?
The last countertop we’ve redone is the Family Room Bar.

We went with Granite down here, and it is beautiful. We had considered Vetrazzo Alehouse Amber, but at the end of the day, the price was right on the Granite. We use this space a lot: especially the kids. There’s a microwave tucked under the counter and a stove right around the corner of that arched doorway; it works really well when they need to “fend for themselves” for lunch or dinner. As such, the space does get a fair amount of abuse. It’s holding up great, but just doesn’t seem to have quite the same original “Shine” as the Silestone has maintained.
All that being said, in a heartbeat, I would do the Silestone in the kitchen and the Granite in the Bar the exact same way over again. Now, the marble in the Master Bath…? It IS beautiful, and if I was redoing AGAIN, I am not 100% sure I’d go with it again, but, I’m not 100% sure I wouldn’t either. So, there ya go!
Linked to Remodelaholic's Anon.
I love my kitchen….Cook Top
When we redid the kitchen, we moved the cook top from the Center Island that was there to the perimeter. We wanted it on the most visible wall when you entered the room, and we wanted it to be pretty.
The BEFORE

And the AFTER

The BEFORE

And the AFTER

I love the lighted glass cabinets above, the fantastic job the cabinet makers did on the curved cabinetry, which is hiding my Zephyr Twister Power Pack for ventilation and light (HIGHLY recommend), my Pot Filler Faucet, and the tile work back splash, with four different sizes of tile, which I designed myself. And I got to help the tile guy, too. He may have not thought I was being helpful, but I had fun.
We swapped out to a gas cook top, which I love. And then underneath that are these huge drawers to hold our pots and pans.

I love my kitchen cook top!
Linked to Remodelaholics Anonymous.
The BEFORE

And the AFTER

The BEFORE

And the AFTER
I love the lighted glass cabinets above, the fantastic job the cabinet makers did on the curved cabinetry, which is hiding my Zephyr Twister Power Pack for ventilation and light (HIGHLY recommend), my Pot Filler Faucet, and the tile work back splash, with four different sizes of tile, which I designed myself. And I got to help the tile guy, too. He may have not thought I was being helpful, but I had fun.
We swapped out to a gas cook top, which I love. And then underneath that are these huge drawers to hold our pots and pans.

I love my kitchen cook top!
Linked to Remodelaholics Anonymous.
The YUCK in my YUM
First, the YUCK!
When we remodeled the kitchen and decided to take out the cabinets ourselves, I was not prepared for the amount of icky, nasty crud we would unveil.

When we remodeled the kitchen and decided to take out the cabinets ourselves, I was not prepared for the amount of icky, nasty crud we would unveil.

Now this isn't just normal dirt: it was sticky, greasy, NASTY dirt. We should have expected it...remember the kitchen cabinets?
"Don't worry about losing that Pizza Hut number, I'll just write it in PERMANENT BLACK SHARPIE MARKER on the cabinet door! Problem solved."
Remember Harper's bedroom?
Really, what were the former owners thinking?
The great thing about unveiling the crud was that we had the opportunity to get rid of it. First we shop vac'd it all up and then even mopped the sub floor. Now that it's all done, no one but us will ever know, but WE know!
And here's my YUM!


Nine Lives of a Fireplace
***UPDATE BELOW***
The Hearth Room Fireplace is really cool. It has some lovely shapes and architecture. It also has gas logs, and during the Winter, we use it nearly every weekend morning, as well as many evenings. It has gone through multiple transformations in three short years.
This is the Fireplace before we moved in, during the initial cleaning. My mother, always prepared, has her water bottles lined up as she took on the cleaning of this room, which includes the kitchen. (I'll have to ask her to guest blog about that adventure one day soon!) Also, notice that the floors have not been redone yet. One thing you can't see is that the metal trim around the fireplace glass was painted with fleck stone paint over brass and it was flaking off in huge chunks.
 Here, the floors have been redone, but we haven't moved in. (Wow! I almost forgot how many nights and weekends we spent at the house prior to the move. We got the house on August 15th, and moved in on November 28th.) Notice the light above the fireplace. It was supposed to point to the fireplace, shining light on it, but my mom broke it cleaning it! That still makes me laugh. At this time I had also taken the glass doors off, scraped off the fleck stone and repainted with high heat black paint--like you would use for a BBQ grill.
 Next, we decide to paint the wall and the trim around the fireplace. The mantle was enameled wood, but, aside from the tile, everything else was wall. I sanded the mantle, primed everything and then painted it all Bulldog Black. I struggled with whether or not I should paint the baseboard and crown moldings black, or leave them white. In the first go round, I left them white, knowing I could always paint them later. We also replaced the floor's plain vent covers with some decorative and sturdier ones from Lowe's.

When we redid the kitchen and added the Bar/Entertainment Center, we also had the fireplace re tiled. We used 1x1 polished Emperador Dark tile, which matches the mosaic work behind the cook top. The polished catches the light in the most interesting ways--so sparkly! I also went back and did the baseboards and the crown in black...MUCH better.
 We chose to have the floor tile replaced with hardwood. (Not a big deal, as we had moved the appliances, which caused some necessary repatching in the kitchen proper.) ***UPDATE*** The decision to put the wood in on the diagonal was RYAN'S! Thanks, mom! the Hardwood Floor Guys did an excellent job executing, but the idea goes to Ryan***Our Hardwood Floor Guys suggested putting the wood in at a diagonal into the already existing square surround. This simple change also makes the space feel bigger. When pushing your chair out from the table, you don't 'bump' onto the tile, but the hearth is still implied.

We replaced the white wood blinds with 2" stained wood that matches some of our kitchen cabinets from justblinds.com and purchased and hung a different light over the table. We discussed moving the box to center it, but ultimately decided that swagging the chain was acceptable. (I don't even notice it any more.)

The rear of our house faces Southwest and during the hot summer months, the sun came BLARING through the transoms, especially that one over the door to the deck. We tried heat film on it, which did help, but the kitchen could be as much as 10 degrees warmer than the rest of the house during the evening.

So, as much as I hated to cover up the windows, we purchased another set of blinds. After hanging them, you could immediately feel the difference. And I am pleased with the way they look.

Now, I just need some curtains, and this one room might actually be done. GASP!! However, that will be a very long time, as I have NO idea what kind of curtains would look good here. Any thoughts would be appreciated!

The Hearth Room Fireplace is really cool. It has some lovely shapes and architecture. It also has gas logs, and during the Winter, we use it nearly every weekend morning, as well as many evenings. It has gone through multiple transformations in three short years.
This is the Fireplace before we moved in, during the initial cleaning. My mother, always prepared, has her water bottles lined up as she took on the cleaning of this room, which includes the kitchen. (I'll have to ask her to guest blog about that adventure one day soon!) Also, notice that the floors have not been redone yet. One thing you can't see is that the metal trim around the fireplace glass was painted with fleck stone paint over brass and it was flaking off in huge chunks.
 Here, the floors have been redone, but we haven't moved in. (Wow! I almost forgot how many nights and weekends we spent at the house prior to the move. We got the house on August 15th, and moved in on November 28th.) Notice the light above the fireplace. It was supposed to point to the fireplace, shining light on it, but my mom broke it cleaning it! That still makes me laugh. At this time I had also taken the glass doors off, scraped off the fleck stone and repainted with high heat black paint--like you would use for a BBQ grill.
 Next, we decide to paint the wall and the trim around the fireplace. The mantle was enameled wood, but, aside from the tile, everything else was wall. I sanded the mantle, primed everything and then painted it all Bulldog Black. I struggled with whether or not I should paint the baseboard and crown moldings black, or leave them white. In the first go round, I left them white, knowing I could always paint them later. We also replaced the floor's plain vent covers with some decorative and sturdier ones from Lowe's.

When we redid the kitchen and added the Bar/Entertainment Center, we also had the fireplace re tiled. We used 1x1 polished Emperador Dark tile, which matches the mosaic work behind the cook top. The polished catches the light in the most interesting ways--so sparkly! I also went back and did the baseboards and the crown in black...MUCH better.
 We chose to have the floor tile replaced with hardwood. (Not a big deal, as we had moved the appliances, which caused some necessary repatching in the kitchen proper.) ***UPDATE*** The decision to put the wood in on the diagonal was RYAN'S! Thanks, mom! the Hardwood Floor Guys did an excellent job executing, but the idea goes to Ryan***Our Hardwood Floor Guys suggested putting the wood in at a diagonal into the already existing square surround. This simple change also makes the space feel bigger. When pushing your chair out from the table, you don't 'bump' onto the tile, but the hearth is still implied.

We replaced the white wood blinds with 2" stained wood that matches some of our kitchen cabinets from justblinds.com and purchased and hung a different light over the table. We discussed moving the box to center it, but ultimately decided that swagging the chain was acceptable. (I don't even notice it any more.)

We thought we were done. Then summer came.
The rear of our house faces Southwest and during the hot summer months, the sun came BLARING through the transoms, especially that one over the door to the deck. We tried heat film on it, which did help, but the kitchen could be as much as 10 degrees warmer than the rest of the house during the evening.

So, as much as I hated to cover up the windows, we purchased another set of blinds. After hanging them, you could immediately feel the difference. And I am pleased with the way they look.

Now, I just need some curtains, and this one room might actually be done. GASP!! However, that will be a very long time, as I have NO idea what kind of curtains would look good here. Any thoughts would be appreciated!

Linked to Metamorphosis Monday @betweennapsontheporch
Pot Filler Faucet
That's right. I have a pot filler faucet. In blogspeak, let me just say...
It. Is. Amazing.
It feels almost decadent to stand at the cook top and fill up a pot with the thing, especially when the prep sink is literally right behind me. But, of course, it is BEHIND me, and that would mean TURNing and LIFTing and CARRYing a full pot of water from sink to cook top. EGADS!
It really is cool! And it's so fun to get the comments on it. Plus, since we eat pasta a minimum of once a week, we really use it.
The filler in action!

Hearth Room Entertainment Center countertop and sink
In honor of the awesome giveaway at The Granite Gurus, I am inspired to post about what I chose as my favorite color granite to enter the contest.
We have been remodeling, and have been replacing countertops and tile, oftentimes with granite and natural stone.
In the kitchen, we went with quartz - Silestone Sienna Ridge from the Mountain Series for the kitchen proper and Emperador Dark for backsplash accents and the Hearth Room Fireplace. The Master Bath,Crema Marfil Marble for the double sink countertops and some of the tile. Baltic Brown Granite for the Vanity turned Morning Kitchen and travertine for the shower floor. In the family room bar, we replaced the formica counter top with New Venitian, and we used a slate listello to accent the new shower downstairs, too.The Living Room and Family Room fireplaces were already tiled in two very different slates, but I don't know what they are called: one is bluish/greenish and the other is more brownish/orangish.
I love them all, but chose the Black Galaxy we put on the entertainment center/bar because of the way the copper flecks highlight the copper sink. I didn't want black because my friend Katie put black in her kitchen and said it was a bugger to keep clean. But, we only have two small spots of it on the bar, and it really is pretty.

On a personal note, the boys left for the Cosmosphere today for Space Camp. Tanner will be gone for the entire week.
IR Repeaters - Keeping the components hidden
When we built the bar/entertainment cabinet in the Hearth Room, we wanted to hide the components, but we didn't want to use fabric in the cabinetry. The answer, an IR Repeater. Cost: around $100.
I was concerned because we had tried an el-cheapo version in the bedroom and the delay was so long it was painful. Ryan promised me this one would be better, and, yet again, he was right!
The components all go inside the cabinet.
 Next, Ryan DRILLS A HOLE in our brand-new, custom-made, not-cheap cabinetry. He then installs the All-Seeing Eye
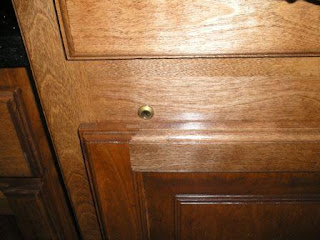 This is where it gets technical.
Our son comes along and hooks up the ends of all these sticky wires to the blinky part of each component where the signal from the remote goes.
We shut the cabinet door. It works like a dream.
Not a component in site and ZERO delay!

AND I get another Harmony remote for this set up. SWOON!
I was concerned because we had tried an el-cheapo version in the bedroom and the delay was so long it was painful. Ryan promised me this one would be better, and, yet again, he was right!
The components all go inside the cabinet.
 Next, Ryan DRILLS A HOLE in our brand-new, custom-made, not-cheap cabinetry. He then installs the All-Seeing Eye
 This is where it gets technical.
Our son comes along and hooks up the ends of all these sticky wires to the blinky part of each component where the signal from the remote goes.
We shut the cabinet door. It works like a dream.
Not a component in site and ZERO delay!

AND I get another Harmony remote for this set up. SWOON!
Moving Appliances
When the decision was finally made to gut the kitchen and start from scratch, we had the opportunity to move the appliances. We'd already decided to move the cook top from the center island to the perimeter counters, but then we also had options for the microwave, fridge, dishwasher and ovens. Ryan fought me HARD on moving the fridge, but I won and he concedes that it's better in its now location. We kept it on the same wall, but slid over about 4 feet, making it closer to the main sink. This also opened up the right side where we put a stacked microwave and oven. I wish you could get microwave doors to switch to open on the opposite side like you can on dryers and some refrigerators; if the micro door opened the other way, it would be perfect. As is, it's 92% perfect.
Before:

After:

Before:

After:

Kitchen Remodel - Demolition
While Ryan and I like our projects, the kitchen was almost a total PSE (Pay Somebody Else). We did decide to save some money and do the demolition ourselves. We also planned to reuse the cabinets in Ryan's workshop downstairs and wanted to save as many cabs as possible.
It was much easier than we thought, and we did learn a few things. First, start with the bottom cabinets. When new cabinets are installed, they do the tops first so they can get closer to the wall and get underneath for leverage. It makes sense, but I don't know if we would have come up with that on our own. Luckily, our cabinet guys gave us the tip before we started.
Second, make sure all of your faucets have shut off valves. We got to the sink and, lo and behold, no shut off valves. Ryan made a quick trip to the hardware store and was able to install what we needed to continue the project.
Third, make plans for all of your crap. We didn't do this and ended up moving stuff more than once.
And last, be prepared for the disgusting crud you will find under and behind the cabinets. uhg.
We started with the island

And then continued to move around the kitchen until all was gone.


Kitchen Remodel - where to put the cooktop?
When we started talking about remodeling the kitchen , we first discussed keeping the cabinets and refacing them. That would mean saving a lot of cash, which I really like, but would also mean keeping all the appliances in the same place, which I really didn't like. One of the biggies for me was that the cook top was on the center island.
 I tried using the cook top a lot to make sure I wanted to move it, and wouldn't be pissed off at myself later when I realized it had been in the perfect spot to begin with.


What I liked about it in the island was 1. It made the work triangle really nice, everything was well within the recommended distance 2. When cooking things that require a lot of constant attention and/or stirring, it was nice to be there able to watch TV or chat with folks.
What I didn't like was 1. In this island, there was simply not enough space. With only 9 inches on each side of the cook top, I didn't have the space for my big pan lids and multiple ingredients - also limited cabinet space here for oils and spices. 2. Again, the size (it DOES matter!) - with the cook top taking up the space on the island, we felt like we were missing out on a great serving spot. 3. That stupid bump up - it was a half circle and was ugly and inefficient. and 4. Did you notice that gray trivet thingy on the right side of the island? That was permanently adhered to the counter top. THUS, we decided to move the cook top to the perimeter and replaced the center island with one that was longer and skinnier.

(I tried to stand in the same spot when taking the photo so you can appreciate the change in size.)
Being skinnier makes it so much easier to get around (hah! just like when I'm skinner!) - especially when I'm cooking and the kids are getting in the fridge to spoil their dinner. The angled-out end works great and fits well with the angled-in cabinet on the opposite side where the big sink is.
Kitchen Remodel - The BAR
Ryan has always wanted a bar in the house. Of course he wanted a bar in the basement, but what he really coveted was a bar in the main living area. Although primarily a beer and bourbon man, I think he pictured himself making martinis for our fancy dinner guests. (People that know us are snickering at this.) We built our second house, and before we bought this fixer-upper, thought we would build our third. In the multitude of floor plans that we found or drew, Ry always wanted that bar. So, luckily for him, when we redid the kitchen, we had the perfect spot. Easy access to plumbing, the space AND an empty wall. Here's the Before (note the Empty Wall):

And the After:
 It turned out really good. The sink is to the far right, and the fridge is under the TV on the right hand side. The cabinet guys made a matching front for it, and it has an ice maker in it, too! cool! The electronic components are under the TV on the left hand side. More on that later.
Linked to Remodelaholic.
Kitchen Remodel
Our first big project when we got the house was the kitchen. The space is really nice; it's open to a good-sized dining and seating area, with plenty of room for our family. I didn't love the layout of the kitchen and cooked many pretend meals to determine the best triangle for every day use.
The old cabinets were...umm...well, let's say they would look FANTASTIC in a garage or workshop. But, the real kicker? Some of the previous owners (we have been told there were five in 12 years) had written inside the cabinet doors in black Sharpie marker things like "Blockbuster 525-0642" and "Pizza Hut 1-800-468-1412".
Really.
So, after multiple drafts on the graph paper, we completed the project. Here's the Before - this is when we were cleaning before we moved in:

And here's the After:
Like all things in my life, it's still not done. We did add a light above the center island (I can't take a new picture because my husband and son have the digital camera with them on a school trip to DC/NY), and I still want to make some kind of curtain for the window. Also, we added a couple of bar stools. The project took 4 months in all from demo to completion, but also included a bar/entertainment center and a redo of the fireplace. And we are so happy with it all!
Subscribe to:
Posts (Atom)